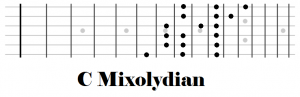
When students are learning alternate picking, it’s really common to start with three-note-per-string exercises because they lay out really nicely on the fretboard. For example, if we’re playing over a C7 chord, we might play the C mixolydian scale (aka the C mixolydian mode). In the middle region of the fretboard, it can be laid out like this:
One thing that I like to do to make it sound a little more interesting (and a little bit less predictable) is to vary where I’m making the changes between strings.
The pattern that I’m going to show you is an exmaple of that. It is a nine-note pattern that repeats in a way that makes it sound kind of unpredictable, and it allows you to add accents in places that really make it sound cool.
The Complete Pattern
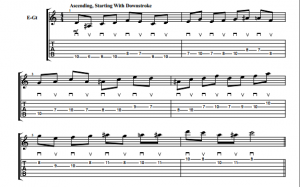
So let me just first show you the pattern, and then I’ll break it down. The ascending form of the pattern goes like this:
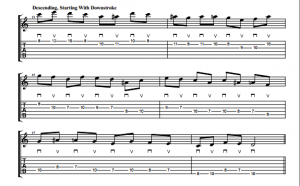
The descending version goes like this:
The Ascending Version Expained
So let’s take a look at that ascending version again. We have a nine-note pattern that begins on Bb at the 6th fret of the low E string. We repeat that same pattern on the next string, then on the next string, and so on, until we’ve run out of strings.
To start, let’s put a label on each string’s three resident notes. Let’s call them: low note, middle note, and high note. (Who would’ve guessed?)
Our pattern will be based on these labels. The pattern is:
- Starting on low E string, play: high note, low note, middle note, high note.
- Then we come to the next string (the A string), and we play: middle note, low note.
- Then we come back to the low E string and play: middle note, high note.
- Finally, we go back to the A string once more and play the low note.
And that completes the nine notes. Then we will repeat that same pattern again, but now we’ll be starting on the A string and going up to the D string. Once we’ve completed the pattern there, we start on the D string moving to the G string, and so on, until we’ve run out of strings.
(NOTE: Check out the full video above to hear my demonstrations of these patterns!)
Now for this exercise, it really doesn’t matter whether you start with an upstroke or a downstroke (and I recommend practicing it both ways). Each time you repeat the pattern, you’re going to be alternating the type of stroke you start with.
So if you started with a downstroke and completed the nine notes, you would start the next set of nine notes with an upstroke, and vice versa.
NOTE: I also really love this pattern because it trains both inside picking and outside picking. Here’s another good example of an exercise that works both inside picking and outside picking:
The Descending Version Explained
Now let’s take a look at the descending version of this pattern. The descending version is literally just a mirror image of the ascending version:
- Beginning on the high E string, we play: low note, high note, middle note, low note.
- Then we come to the B string and play: middle note, high note.
- Then we go back to the high E string and play: middle note, low note.
- And then we come to the B string and play the high note.
And that completes the nine notes.
Then we repeat the pattern starting on the B string, then again on the G string, and so on, until we’ve run out of strings.
Practice Tips For The Nine-Note Alternate Picking Exercise
I recommend using a metronome when you’re practicing this. I suggest playing it at least ten times without making a mistake before you bump up the metronome to the next level of speed.
Start with a manageable tempo – something that isn’t too difficult, a tempo that you feel like you can handle with relative ease – and make sure that you’re playing it in a very relaxed way.
It’s very important to not focus on the speed at first, but rather to focus on getting a clean note with every pick stroke. Once you’re able to play it cleanly ten times, without making a mistake, then you’re ready to turn up the speed on the metronome.
How Much Should I Increase The Metronome Speed?
I don’t recommend making big, sudden leaps in tempo. It kind of depends on your starting tempo, but increasing the tempo in 5 to 10 bpm increments is usually a safe bet.
Then, once you once you’re able to execute the lick ten times without making a mistake, go ahead and bump it up a little bit more.
Keep repeating this process until you’re playing at your desired tempo (or until you’ve melted the faces or passersby with your supersonic shredding speed).
Use a Relaxed Technique For Alternate Picking
Make sure that you’re feeling relaxed physically. When we’re mentally concentrating on something very intensely, that can sometimes translate into physical tension in the body. It’s really important to be aware of that, and to pay attention to it, so as to avoid it. Because it doesn’t need to be so!
In fact, tension in the hands (and in the body generally), is really the enemy of speed when it comes to guitar technique. This can become especially evident when practicing this alternate picking exercise, as each new note requires movement from both hands.
Another one of the benefits of gradually increasing the speed is that you’re never making gigantic leaps that require a massive change in your technique. It’s all going to come very gradually, and that is great for keeping your technique consistent!
If you can play it at a given tempo in a very relaxed manner, and very cleanly, then you won’t really have to make that much of an adjustment to speed it up by five or ten BPM.
Okay guys, that’s all for this lesson. If you enjoyed this alternate picking exercise, please subscribe to the email list, and feel free to share this with your friends!
I’ll be back for another lesson very soon, but until then, you guys take care and happy shredding!
Check out my full selection of guitar tutorials here!
Related Posts:
How To Plan A Guitar Practice Routine